This Guide will cover creating a Windows Domain Controller VM for your home lab on VMware Workstation. To do this will will use the template we created in step 3 and then create a linked clone from that template. After that we will promote the system to a domain controller and create a new domain.
Step 3) Select an existing snapshot and select the name of your snapshot then hit Next.
Step 9) Select network adapter and select finish.
Step 10) Select the first network adapter you added and set the network connection type to costume and select VMnet0 or what ever you named the VM traffic network.
Step 11) Select the first network adapter you added and set the network connection type to costume and select MGMT or what ever you named the Management traffic network.
Step 12) Select your personal settings and select next
Step 13) Enter your product key and select next.
Step 14) Accept the EULA.
Step 15) Set the Administrator password for the local account and select finish.
Step 16) Modify the system name of the VM I like to make this the same name as the one that I use in VMware workstation.
Step 17) Set a static IP address for the first network interface. This one will be the interface used for VM traffic.
Step 18) Set a static IP address for the second network interface. This one will be the interface used for management traffic.
Step 19) Go to Server Manager and select add role.
Step 20) Select Role-based or feature-based installation and select next.
Step 21) Select next
Step 22) Select Install
Step 23) Select Promote this server to a domain controller after the install process is completed.
Step 24) Select Add a new forest and enter a root domain name and select next.
Step 25) Set the forest and domain functional level that you want to use. Then check Domain Name system server and Global catalog capabilities. Last set the restore mode password and select next.
Step 26) Select next
Step 27) Set the NetBIOS name and select next.
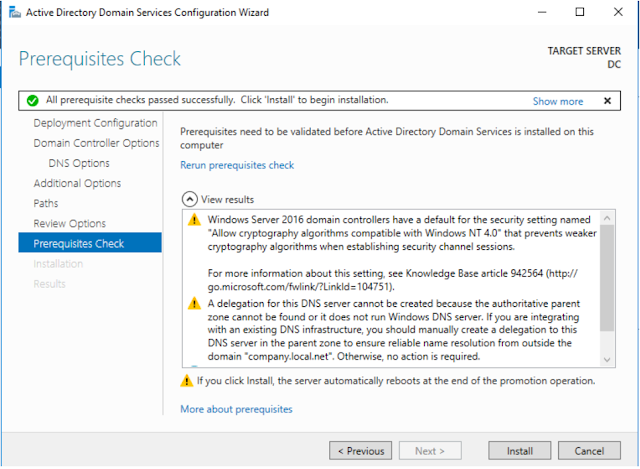
Step 28) Select install
Step 29) After the install is done you will be asked to reboot the server.
Step 1) Select Next
Step 2) Select use the following user's credentials then select commit.
Step 3) Select Close
Step 4) Now create a new DHCP scope and select next
Step 5) Give the scope a name and description if you want and select next.
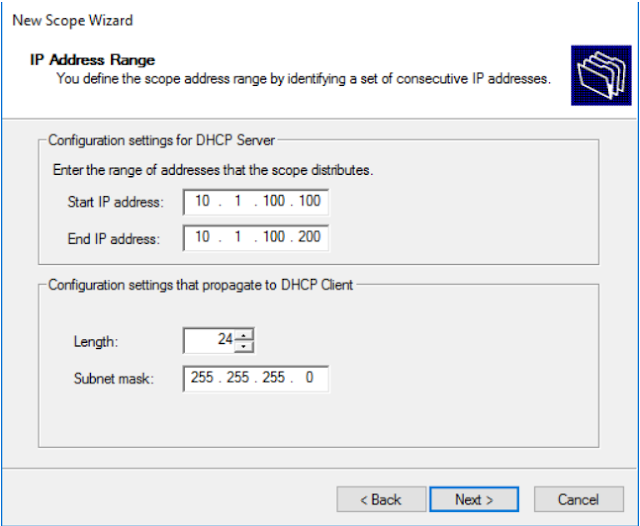
Step 6) set the starting and ending IP address range for the scope and then the subnet mask. Then select next.
Step 7) Select next unless you want to set some exclusions or delays.
Step 8) I like to set the lease time to 1 day for my lab.
Step 9) Select yes i want to configure these option now and select next.
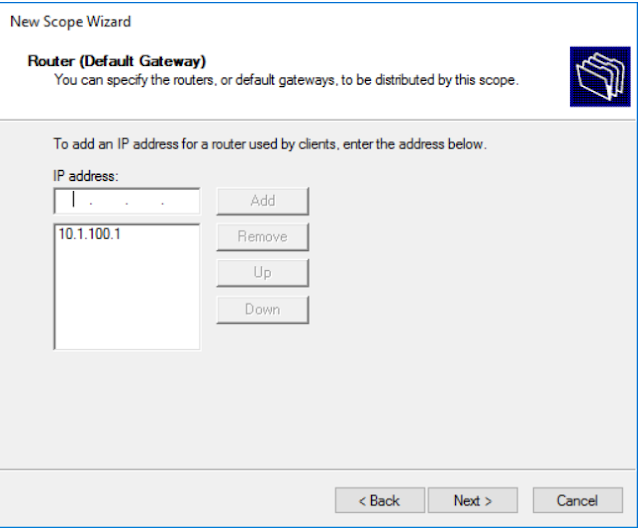
Step 10) Add in your default gateway address and select next
Step 11) Set the parent domain name and add the DNS server ip address. Then select next.
Step 12) I do not use WINS so select next
Step 13) Select yes i want to activate this scope now and select next.
Step 14) Due to having 2 network adapters you need to set bindings. Make sure the scope is set to the VM network and not the management network.
System Configuration:
- CPU: 2
- Memory: 4 GB
- Hard Disk: 60 GB
- Network: 2 vmnic (1 for LAN VM traffic and 1 for management traffic)
- Operating System: Microsoft Windows Server 2016
- Server Roles: AD, DNS, and (DHCP Optional)
Domain Controller Build Process:
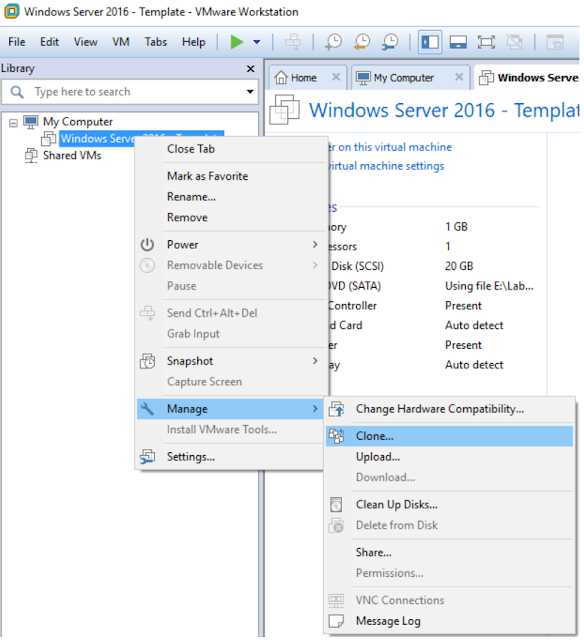
Step 1) Open VMware Workstation and right click the template VM then select Manage > Clone
Step 2) Select NextStep 3) Select an existing snapshot and select the name of your snapshot then hit Next.
Step 4) Select Create a linked clone and hit next.
Step 5) Give a name to the VM and then select finish.
Step 6) The clone process will start this should be a fast process on a SSD disk.
Step 7) After the clone process is done we need to edit the VM settings to add the network adapters on the VM that are required for this VM. We do this by selecting the VM then hitting the edit virtual machine settings link.
Step 8) Next select the add button you will need to do step 8 - 9 two times for each network interface.Step 5) Give a name to the VM and then select finish.
Step 6) The clone process will start this should be a fast process on a SSD disk.
Step 7) After the clone process is done we need to edit the VM settings to add the network adapters on the VM that are required for this VM. We do this by selecting the VM then hitting the edit virtual machine settings link.
Step 9) Select network adapter and select finish.
Step 10) Select the first network adapter you added and set the network connection type to costume and select VMnet0 or what ever you named the VM traffic network.
Step 11) Select the first network adapter you added and set the network connection type to costume and select MGMT or what ever you named the Management traffic network.
Step 12) Select your personal settings and select next
Step 13) Enter your product key and select next.
Step 14) Accept the EULA.
Step 15) Set the Administrator password for the local account and select finish.
Step 16) Modify the system name of the VM I like to make this the same name as the one that I use in VMware workstation.
Step 17) Set a static IP address for the first network interface. This one will be the interface used for VM traffic.
Step 18) Set a static IP address for the second network interface. This one will be the interface used for management traffic.
Step 19) Go to Server Manager and select add role.
Step 20) Select Role-based or feature-based installation and select next.
Step 21) Select next
Step 22) Select Install
Step 23) Select Promote this server to a domain controller after the install process is completed.
Step 24) Select Add a new forest and enter a root domain name and select next.
Step 25) Set the forest and domain functional level that you want to use. Then check Domain Name system server and Global catalog capabilities. Last set the restore mode password and select next.
Step 26) Select next
Step 27) Set the NetBIOS name and select next.
Step 28) Select install
Step 29) After the install is done you will be asked to reboot the server.
Optional DHCP Setup Process:
Note: This step is not needed but can be useful based on what you are doing in your lab. I would also recommend putting the DHCP role on your domain control if you are going to use DHCP.Step 1) Select Next
Step 2) Select use the following user's credentials then select commit.
Step 3) Select Close
Step 4) Now create a new DHCP scope and select next
Step 5) Give the scope a name and description if you want and select next.
Step 6) set the starting and ending IP address range for the scope and then the subnet mask. Then select next.
Step 7) Select next unless you want to set some exclusions or delays.
Step 8) I like to set the lease time to 1 day for my lab.
Step 9) Select yes i want to configure these option now and select next.
Step 10) Add in your default gateway address and select next
Step 11) Set the parent domain name and add the DNS server ip address. Then select next.
Step 12) I do not use WINS so select next
Step 13) Select yes i want to activate this scope now and select next.
Step 14) Due to having 2 network adapters you need to set bindings. Make sure the scope is set to the VM network and not the management network.


Comments
Post a Comment