One of the first things you will want to do is setup a Windows OS template inside of VMware Workstation. The reason you want to do this is so you can save storage space by using the linked clone feature inside of VMware Workstation. This is also very helpful so that you can quickly create windows VMs and don't have to do a full install of the OS each time.
Per VMware a linked clone is a copy of a virtual machine that shares virtual disks with the parent virtual machine in an ongoing manner. Because a linked clone is made from a snapshot of the parent, disk space is conserved and multiple virtual machines can use the same software installation. All files available on the parent at the moment you take the snapshot continue to remain available to the linked clone. Ongoing changes to the virtual disk of the parent do not affect the linked clone, and changes to the disk of the linked clone do not affect the parent. A linked clone must have access to the parent. Without access to the parent, you cannot use a linked clone.
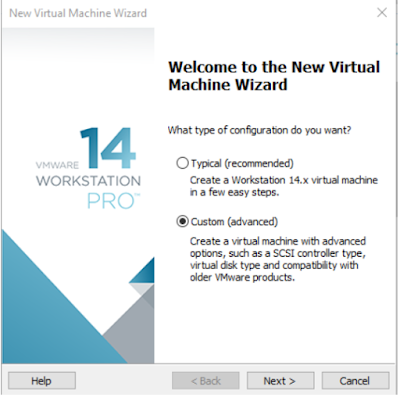
Step 2) Select Custom option on the configuration window then select Next.
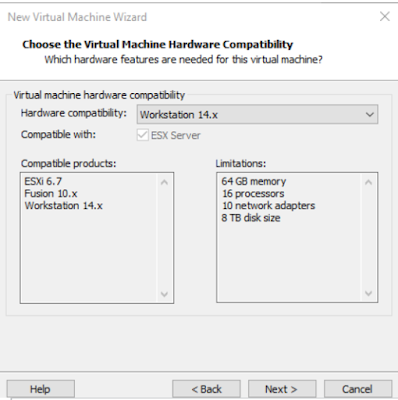
Step 3) Select Workstation 14.x version of hardware compatibility then select next.
Step 4) Select I will install the operating system later then select next.
Step 5) Select the Guest Operating system type and then the version in my case it is Microsoft Windows and then Windows Server 2016 then select next.
Step 6) Enter a name for the VM and then select next.
Step 7) Select the firmware type as BIOS and select next.
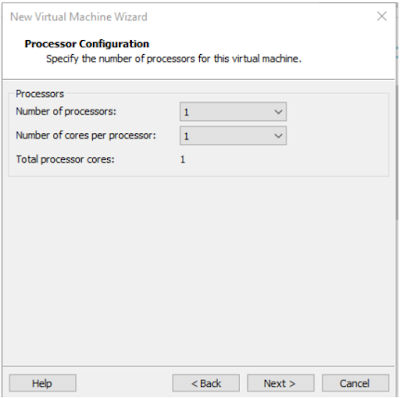
Step 8) Set the processor options to 1 processor and 1 core then select next.
Step 9) Set the memory to 1024 MB or 1 GB then select next.
Step 10) Set networking type to do not use a network connection then select next. (We will add a network connection later so don't worry)
Step 11) Use LSI Logic SAS I/O controller then select next.
Step 12) For disk type use SCSI then select next.
Step 13) Create a new virtual disk and select next.
Step 14) Set the disk size and set the store virtual disk as a single file option and select next.
Step 15) Select next
Step 16) Select Customize hardware button.
Step 17) Pick the CD/DVD option and set it to use ISO image file and find the ISO for your operating system then hit the ok button.
Step 18) Select finish.
Step 19) power on the VM and then select next in the windows setup window.
Step 20) Select the install now button.
Step 21) As this will be a template i will select i don't have a product key and enter that later after we create clones of the VM.
Step 22) Select the operating system you want to install as some of my servers need the desktop experience i will select this option. If you can run everything from the core version of windows select that one.
Step 23) Accept the EULA and then select next.
Step 24) Select custom install windows only option.
Step 25) Hit the new button to create a new partition on the hard disk.
Step 26) Select the new partition then hit next.
Step 27) The Operating system will start to install.
Step 28) The system will boot up and ask you to enter a administrator password. Then hit the finish button.
Step 29) Right click on the VM tab inside of VMware workstation to get a option menu to come up. On this option menu select "Install VMware Tools...".
Step 30) Go to the CD drive on the VM and double click on the VMware Tools to start the install process.
Step 31) Select the next button.
Step 32) Select Complete and then select next.
Step 33) Select the install button
Step 34) Select Finish
Step 35) Hit yes
Step 36) Now you will run a process to clean up the disk so it uses the lowest amount of disk space on the physical system you are running the VM on. The command can be seen below.
Step 37) Next Run a sysprep process on the system by starting sysprep.exe
Step 38) Make sure to select the OOBE, Generalize, and Shutdown options and select ok.
Step 39) Now from the VMware workstation window right click the tab and select settings from the menu.
Step 40)Go to the options tab and then select advanced from the left menu. From the advanced options select "Enable Template Mode (To be used for cloning)" then hit ok.
Step 41) Now take a snapshot of your VM so that we can use that as a starting point of the linked clones. You are now done with the template process.
Per VMware a linked clone is a copy of a virtual machine that shares virtual disks with the parent virtual machine in an ongoing manner. Because a linked clone is made from a snapshot of the parent, disk space is conserved and multiple virtual machines can use the same software installation. All files available on the parent at the moment you take the snapshot continue to remain available to the linked clone. Ongoing changes to the virtual disk of the parent do not affect the linked clone, and changes to the disk of the linked clone do not affect the parent. A linked clone must have access to the parent. Without access to the parent, you cannot use a linked clone.
Template Process:
Step 1) Start VMware Workstation and select the file menu and select New Virtual Machine from the menu.Step 2) Select Custom option on the configuration window then select Next.
Step 3) Select Workstation 14.x version of hardware compatibility then select next.
Step 4) Select I will install the operating system later then select next.
Step 5) Select the Guest Operating system type and then the version in my case it is Microsoft Windows and then Windows Server 2016 then select next.
Step 6) Enter a name for the VM and then select next.
Step 7) Select the firmware type as BIOS and select next.
Step 8) Set the processor options to 1 processor and 1 core then select next.
Step 9) Set the memory to 1024 MB or 1 GB then select next.
Step 10) Set networking type to do not use a network connection then select next. (We will add a network connection later so don't worry)
Step 11) Use LSI Logic SAS I/O controller then select next.
Step 12) For disk type use SCSI then select next.
Step 13) Create a new virtual disk and select next.
Step 14) Set the disk size and set the store virtual disk as a single file option and select next.
Step 15) Select next
Step 16) Select Customize hardware button.
Step 17) Pick the CD/DVD option and set it to use ISO image file and find the ISO for your operating system then hit the ok button.
Step 18) Select finish.
Step 19) power on the VM and then select next in the windows setup window.
Step 20) Select the install now button.
Step 21) As this will be a template i will select i don't have a product key and enter that later after we create clones of the VM.
Step 22) Select the operating system you want to install as some of my servers need the desktop experience i will select this option. If you can run everything from the core version of windows select that one.
Step 23) Accept the EULA and then select next.
Step 24) Select custom install windows only option.
Step 25) Hit the new button to create a new partition on the hard disk.
Step 26) Select the new partition then hit next.
Step 27) The Operating system will start to install.
Step 28) The system will boot up and ask you to enter a administrator password. Then hit the finish button.
Step 29) Right click on the VM tab inside of VMware workstation to get a option menu to come up. On this option menu select "Install VMware Tools...".
Step 30) Go to the CD drive on the VM and double click on the VMware Tools to start the install process.
Step 31) Select the next button.
Step 32) Select Complete and then select next.
Step 33) Select the install button
Step 34) Select Finish
Step 35) Hit yes
Step 36) Now you will run a process to clean up the disk so it uses the lowest amount of disk space on the physical system you are running the VM on. The command can be seen below.
Step 37) Next Run a sysprep process on the system by starting sysprep.exe
Step 38) Make sure to select the OOBE, Generalize, and Shutdown options and select ok.
Step 39) Now from the VMware workstation window right click the tab and select settings from the menu.
Step 40)Go to the options tab and then select advanced from the left menu. From the advanced options select "Enable Template Mode (To be used for cloning)" then hit ok.
Step 41) Now take a snapshot of your VM so that we can use that as a starting point of the linked clones. You are now done with the template process.


Comments
Post a Comment